Smart business owners are always looking for ways to keep their business on the go by assimilating new trends and following the digital road maps for excellence. Having said this, the popularity of mobile devices and their significant place in people’s life is a great opportunity to be tapped.
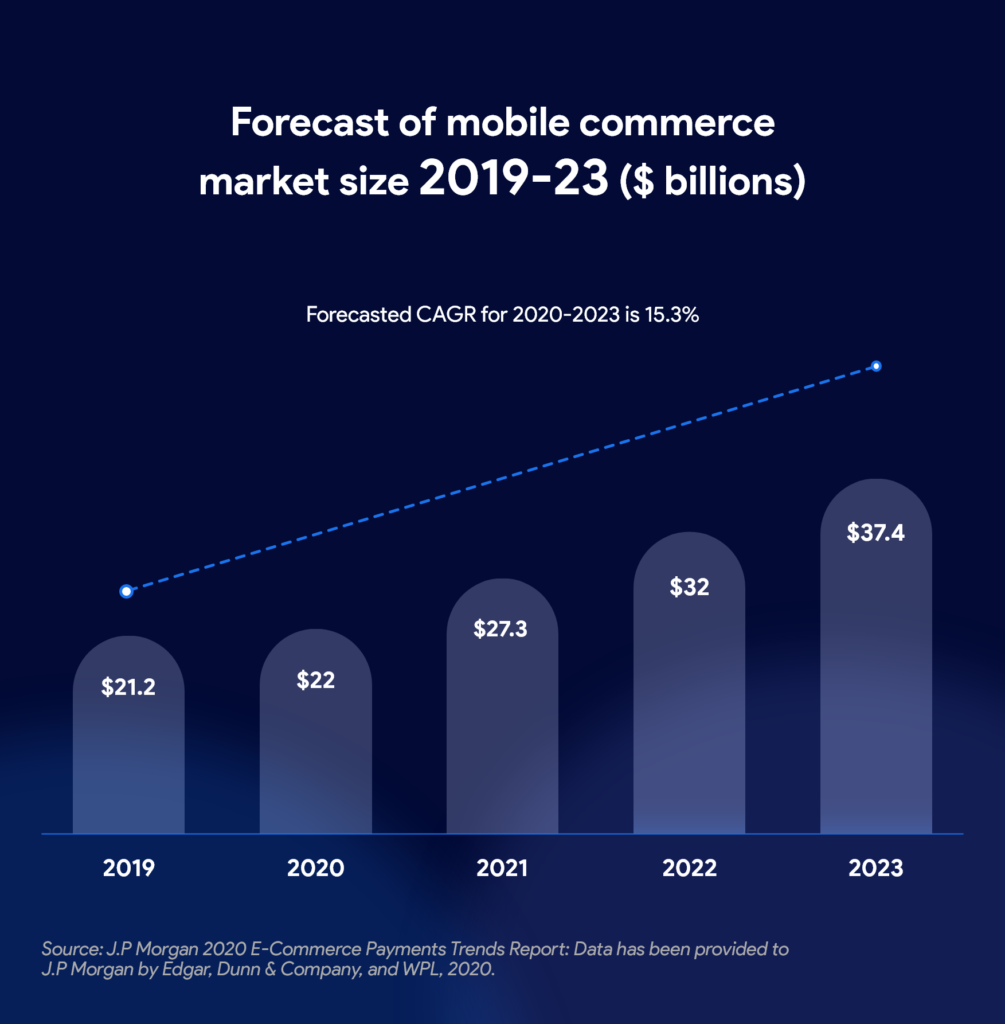
According to a study by Statista, in 2020, the number of global mobile users was 6.95 million while it was projected to touch 7.1 billion by 2021. The ease of use clubbed with the convenience of operation in the palm of your hands has created a remarkable liking towards apps in the eCommerce world. Thoughtfully developed mobile apps will help businesses manage their stores efficiently and boost sales by interacting with their customer base through the apps. Going mobile helps the enterprises to stay in the competition and gain an edge over their competitors.
Why WooCommerce Mobile App?
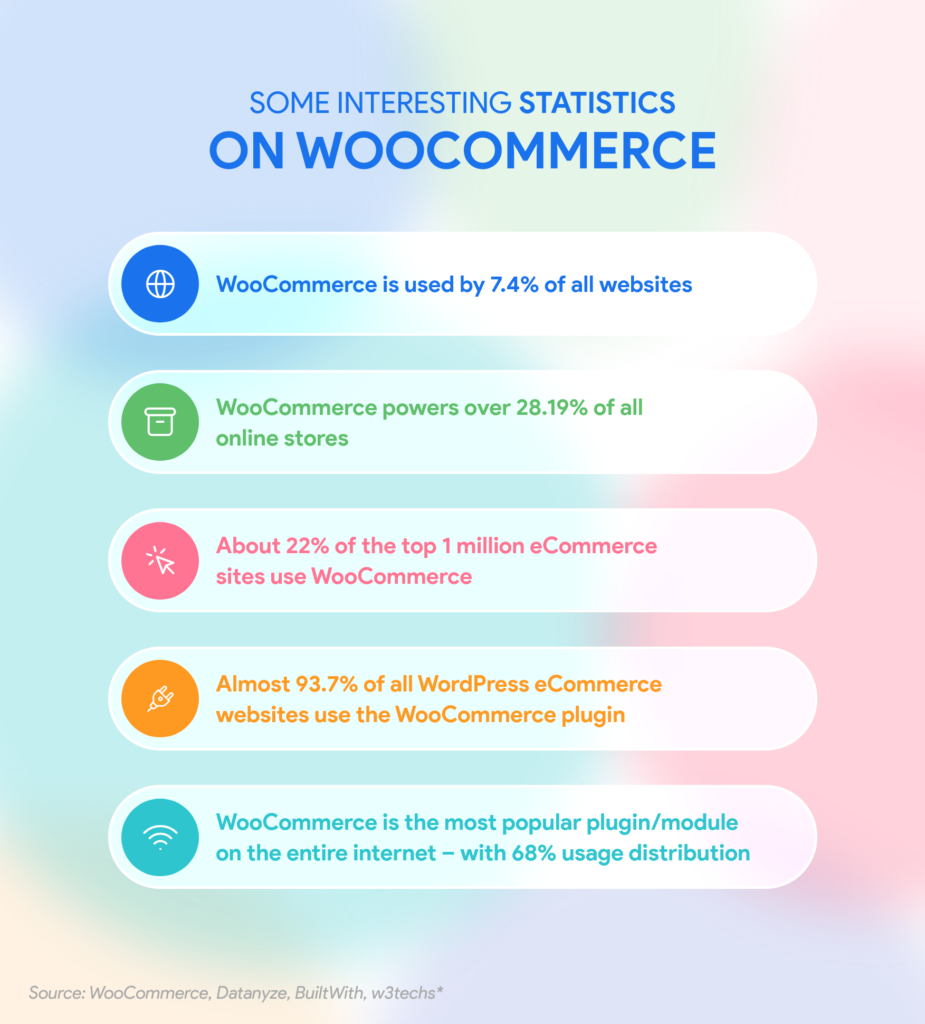
Built on WordPress, WooCommerce ensures that commerce is integrated with content. With its customization options, WooCommerce app makers give you the freedom to turn your website into a commercial one. WooCommerce also offers a wide range of free and premium themes that are highly responsive. You can add unlimited products and users while processing any number of orders with WooCommerce app builders.
WooCommerce app builders help you take your business to next level by converting your website into a mobile app. This way you can easily build a native app for both your iOS and Android users. Converting your WooCommerce store implies increasing your conversions, a simplified purchasing process without logging in, and a better relationship with your customers. Studies show that app users are likely to complete the desired purchase action compared to desktop users.
Already a WooCommerce store owner? Build a Mobile App to Win More Customers
Appmaker specialises in Quality and Performance guaranteed, E-Commerce Android/iOS Apps for E-Commerce Businesses. Get in touch
Having an eCommerce app allows you to manage your store with your mobile device that fits in your pocket. The advantages are numerous such as gaining insightful information to bring in improvements, generating efficient promotional campaigns, creating personalized content, and establishing a marketing strategy.
If you are a Shopify store owner, easily convert your store into a Shopify app with Appmaker in no time.
Already own a Shopify store? Build loyal users with eCommerce Mobile Apps
Appmaker specializes in Quality and Performance guaranteed, E-Commerce Android/iOS Apps for E-Commerce Businesses.
Why do you need WooCommerce mobile app for your store?
Easier and Faster Access
Mobile devices are handy and easier to access. With easy accessibility, eCommerce mobile apps help you place an order faster than a website. The apps generally load and thus let your customer enjoy quick order placement. Also, options for easy login ensure a smooth customer experience and create loyal customers easily.
Better Brand Identity
Having an eCommerce mobile app lets you venture into smart branding to impress the customers. Increasing brand marketing will help in the betterment of your relationship with the customers. Therefore, converting your WooCommerce store into a mobile app is an add-on to your brand’s recognition.
Push Notifications
The push notifications feature of eCommerce mobile apps will help you communicate directly with them even if you are not using your app. Through push notifications, you can directly be in touch with the app users even if they’re not using the app and bring them back to your app. This will ensure increased conversion rates and better engagement. Having an app also helps formulate better marketing communication with your customers.
Native iOS and Apple Apps
Another major benefit of converting a website into an app is that it will be available on iOS and Android. It increases brand recognition, and users can access your app using these platforms in a few simple steps. Build native apps for both Android and iOS platforms and publish on Google Play and Apple App Store.
Product Category List, Ratings, and Reviews
The way you categorize and present your topic plays a major role in engaging the customers. Your WooCommerce mobile app can showcase products under multiple categories to make them more appealing to the users. Also, the customers can rate your products and assist other users to determine which products to buy. Moreover, work on improvements based on the differences in product ratings.
Easy Payment Options
Creating a WooCommerce mobile app gives you the freedom of integrating various mobile wallets for speedy processing. Therefore, you can offer an unhindered checkout process thus mitigating cart abandonment at the last minute. Moreover, contactless payments assure a smooth checkout process convincing the customers to come back in the future.
How to Create an App from Scratch?
Creating an app from scratch starts with building a web store. The first step here is choosing the right platform to build your website. Creating an online store has never been easier with the eCommerce site builder WordPress.
WordPress lets you build your very own online store, without any high-level tech skills or complicated coding. An internet connection clubbed with an innovative idea will do the magic.
If you already have a WordPress website, move on to the next step for converting your WooCommerce website into an eCommerce app. Given below are the steps to build an eCommerce website with WordPress.
Step 1: Get the Prerequisites right
Let’s look at the prerequisites for any eCommerce store:
- A WordPress hosting account where all your website files are stored.
- A domain name – your website’s address on the internet
- An SSL Certificate – For secure online payments
1. Get a Domain Name and Web Hosting
A domain generally serves as your name and address on the internet. It is ideal to choose a domain name as close to your brand name as possible while keeping crisp and memorable. You have to check if the domain name is available and renew it annually based on your plan.
2. Sign up to a hosting provider
A hosting provider is your spot on the internet where your website lives. Sign up for a hosting plan of your choice or get any of the official WordPress and WooCommerce recommended hosting providers.
3. Get an SSL certificate
Procuring an SSL certificate brings in a special security feature to your website so that you can offer secure payments which involve the handling of sensitive information. SSL is mandatory if you need to accept credit card payments on your website.
Step 2: Install WordPress
If you are getting any official WordPress hosting providers, it will automatically install WordPress and WooCommerce on your website. Alternatively, follow the below steps to install WordPress.
There are two main ways to install WordPress:
Step 4: Choose a theme
As a part of customizing your website, pick up a theme that determines the look and feel of your store. There are many free themes included with WordPress for you to select from. You may also purchase a premium theme of your choice if your budget permits.
- Automatically install WordPress with One-click install through your hosting dashboard
- Manually downloading WordPress, then uploading it to your hosting account
Step 3: Install and configure WooCommerce
Now that you have built a website, it is time to set in place the eCommerce functionality in your WordPress website. To install WooCommerce:
- Download the WooCommerce plugin
- Next, go to your WordPress website
- Go to Dashboard > Plugins
- Select Add New > Upload
- Select the downloaded plugin
- Press Install and then Activate
Alternatively, you can search for the WooCommerce plugin from within your website and then activate the plugin.
Step 5: Add products
Start adding products to your by going to Products > Add New. You can also give a title for your product and a detailed description. Other details that you need to update include:
- Product Categories: Helps the users to sort and browse products on your store
- Product Data: This allows you to update product-related information like pricing, inventory, shipping, etc.
- Product Short Description: Helps users when they view multiple products on a page.
- Main Product Image and Product Gallery: Gives the users a visual idea about the product offered.
Once you update your product details, click Publish button to make it live on your website. You can repeat the process to add more products and make them live.
Step 6: Add Install additional plugins
As your store expands scale up the functionalities with additional plugins that allow you to add new features to your website. These plugins help you customize WordPress by adding extra features.
Step-by-step process of creating an app
Appmaker, the zero code app builder, will help you with setting up your Android and iOS app. Installation and configuration of the WooCommerce Appmaker plugin are the initial steps for creating your app.
Creating your app without any coding skills
Step 1: Go to Appmaker and create an account by clicking the Signup button, Log in if you already have an account.
Step 2: Click Get Started on the top-right corner.

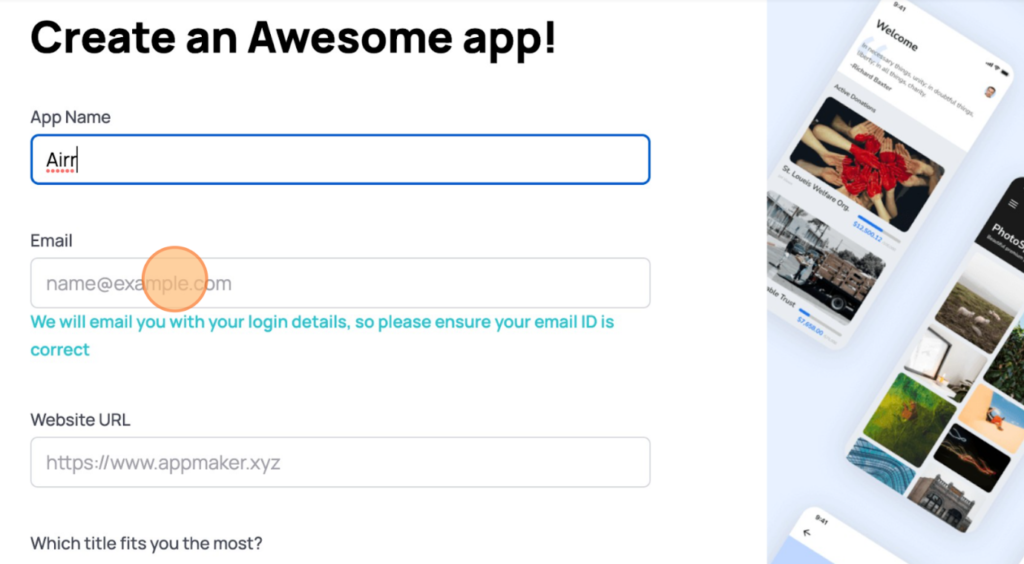
Step 3: Enter the App Name that you want to in the given field. Next, type in email ID and the Website URL of your WooCommerce store in the text box.
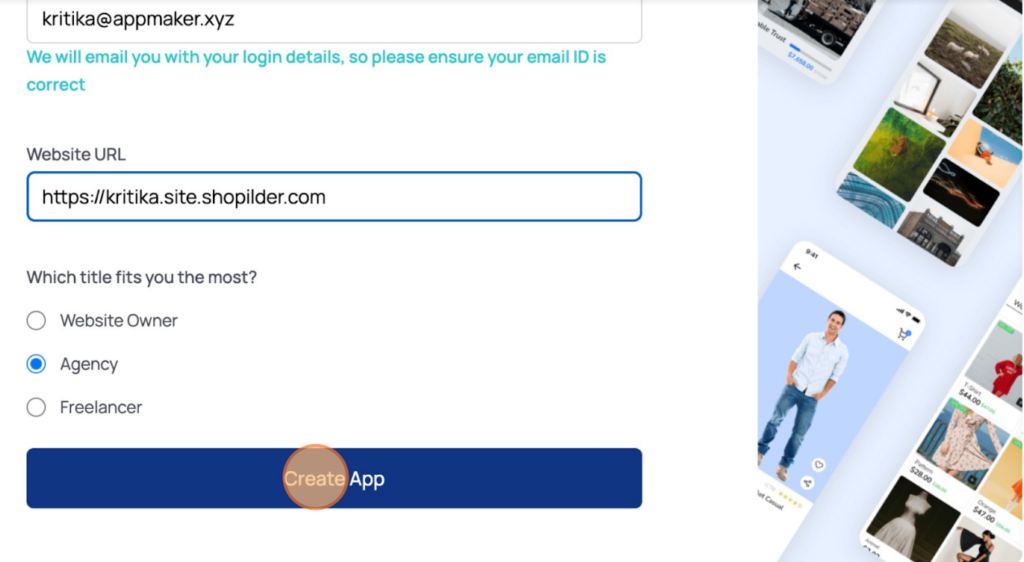
Step 4: Fill in the next field based on your profile and click Create App.
Appmaker Dashboard
After clicking the Create App button, you will be taken to the Appmaker Dashboard, where you will get the Customize App option.
Step 5: The first option under the customize app option is App Icon which usually is your brand logo. To Set an app icon for your mobile app, upload or drag and drop a file.
Click Next.

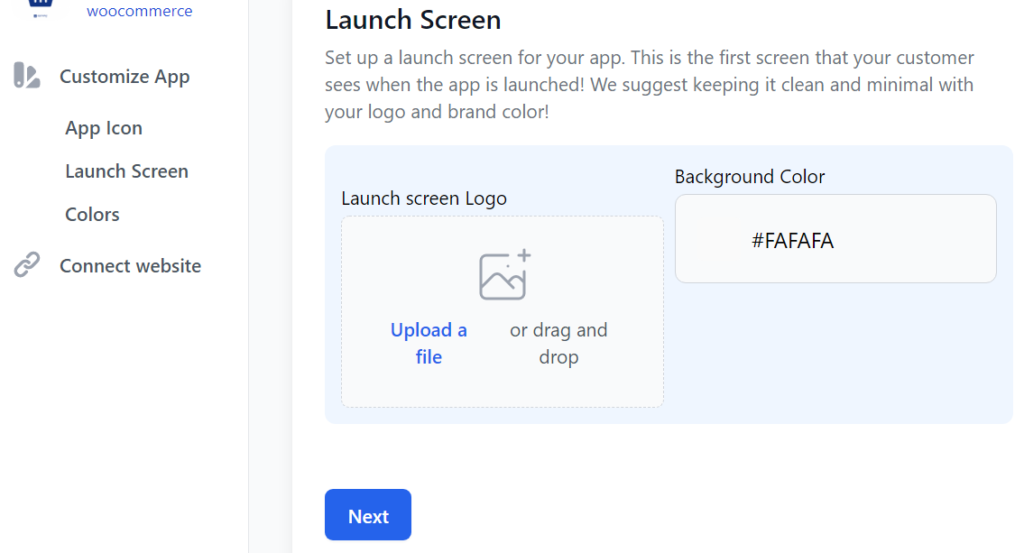
Step 6: Next, set up a launch screen for your app. Upload or drag and drop a file to set up a launch screen and select the background color.
This is the first screen that your customer sees when the app is launched. It is recommended to keep it clean and minimal with your logo and brand color.
Click Next.
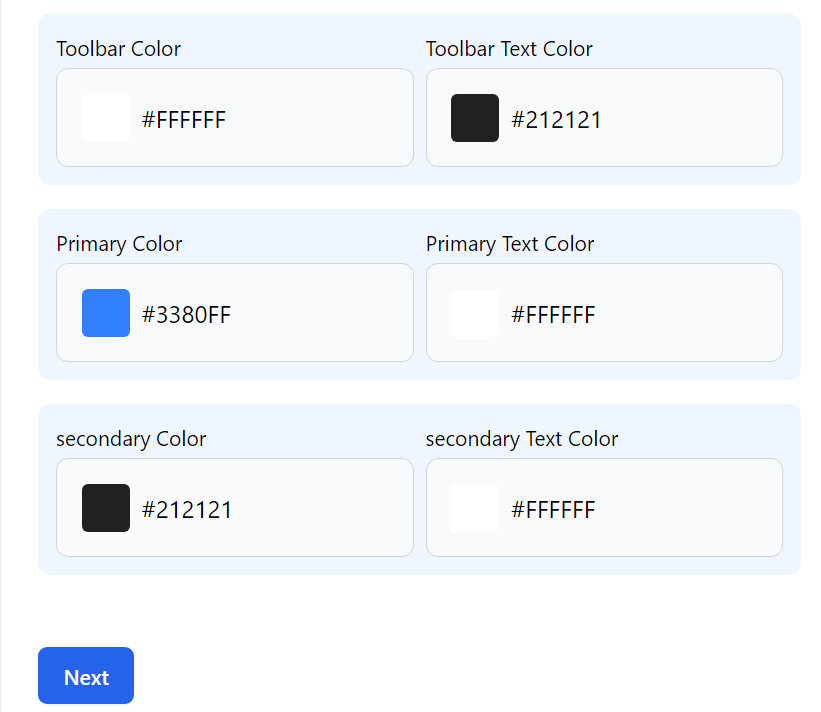
Step 7: Next, style your mobile app by assigning colors to your toolbar. Click on each field to select the colors.
Click Next.
After customizing the app, next comes connecting the app to the website.
Connecting the App to your website
Follow the steps below to install and activate the Appmaker plugin on your website.
Step 1: Install and activate the plugin. Click the Connect Automatically button below. You will be redirected to your WordPress plugin directory, where you can install and activate the plugin.
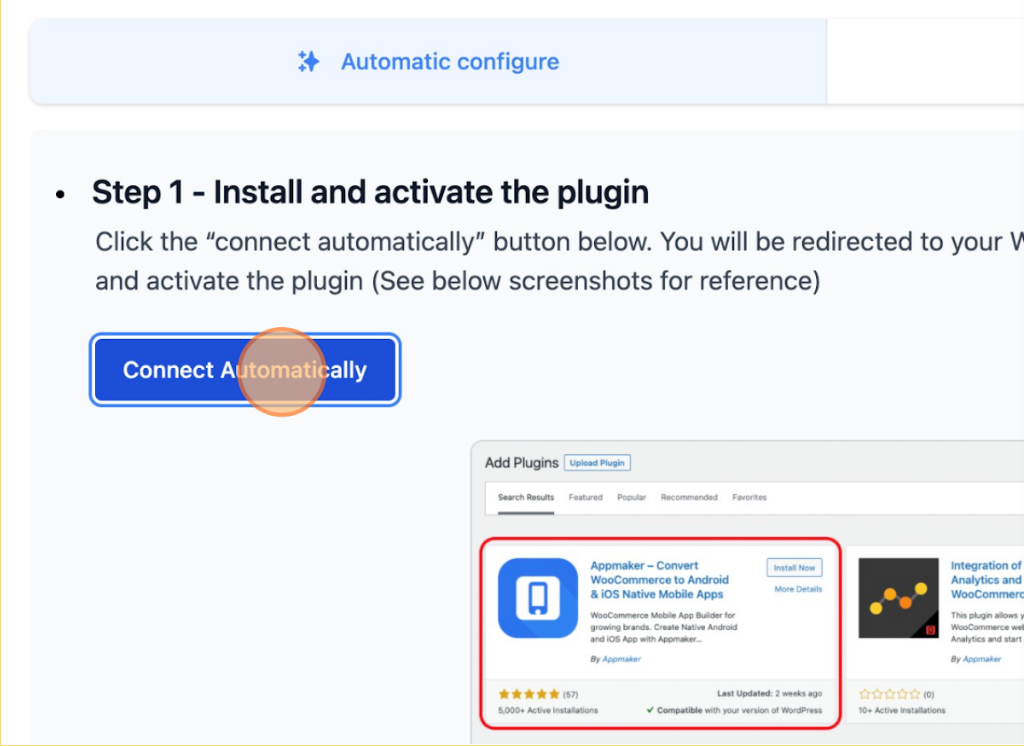
Step 2: After installing the plugin, click Activate.
Note: If you have already finished customizing the App from Appmker Dashboard, copy the Access Key below and paste it into the dashboard.

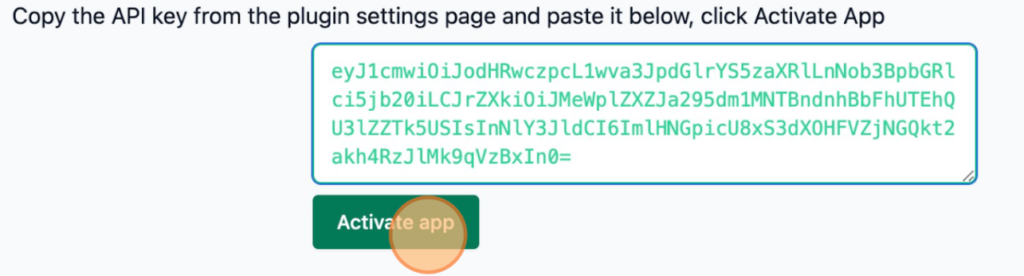
Step 3: Go to Your WordPress admin > WooCommerce > Appmaker App Settings. Paste the Access key copied from the Appmaker plugin settings page on your WordPress dashboard below and click on the Activate App button.
Step 4: Copy the API key from the plugin settings page and paste it below, click Activate App.
This completes the creation of your WooCommerce mobile app using the Appmaker Plugin.
How to build your app to look awesome and function smart?
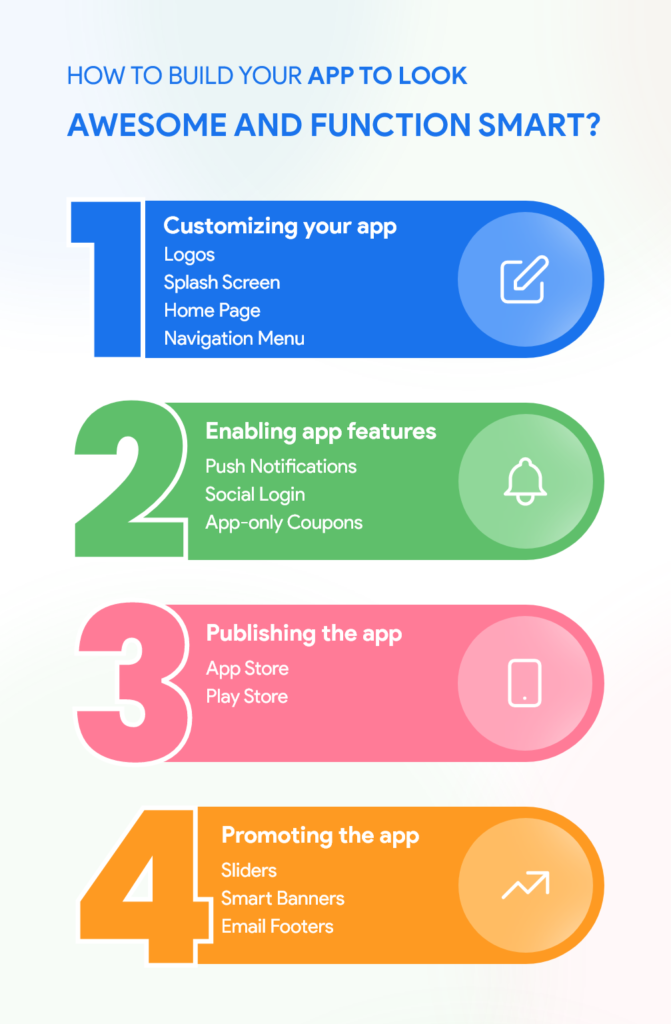
Customizing your app
Logos: Logos and the app icons are the first visual element that a visitor or customer notices about the app. For the same reason, make the first impression count by representing your brand thoughtfully. Logos speak for themselves and hence, it is ideal to spend some time working on your logo.
Splash screen: Splash screen is the image that engages you when the app is loading. Having a splash screen improves the user interface by helping with, aesthetic part together with building up relations with the brand. Hence, enabling an attractive splash screen for your app is a good idea.
Home Page: Homepage, also known as the landing page, contributes the way any customer sees your app for the first time. It is literally the front door and influences a lot in their decision-making. Make it a point to keep your Home page attractive with engaging content and smart navigation.
Navigation Menu: A navigation menu is a road that customer takes go move around your app. It allows the customers to discover what they want and to dig into your app. Therefore, create a well-organized navigation design and make the whole process easy, smooth, and more interactive.
Enabling app features
Push Notifications: By enabling push notifications you can send personalized offers, thoughtful reminders, and other updates on the store to your customers. A little time spent on improving the friendliness and personalization of a push notification will have a winning impact on your sales.
Social Login: Social login improves your app’s user experience and helps conversions by letting the users sign-up with their existing login information from social media networks such as Facebook, Google, Apple, etc. It, thus, simplifies and eliminates the manual registration process which helps in increasing the conversions.
App-only Coupons: As a WooCommerce store owner, you can offer discounts to the customers who make an app purchase. Creating app-only coupons has the potential to boost your app’s popularity among customers and possible customers alike. Click on the link to learn how.
These are only a few lucrative features and to explore more connect to our experts.
Want to explore more? We’re happy to help!
Talk to our in-house experts and make the most out of your app
Publishing the app
After customizing your app and enabling the Appmaker app features, get on to publishing your app. Here are few things which you need to know:
- Prerequisites: Buy and be ready with your Google and Apple Developer accounts so that you can publish your app on both stores using your own developer account. Appmaker does not provide a developer account.
- Publishing Assistance: We provide complete documentation assistance to publish your app. Our experts will be happy to help you out if you are stuck in the process. Appmaker provides publishing assistance for all users in the Growth and Scale plan
Promoting the app
Sliders: Sliders are images on your app that keep sliding with an attractive display of photos. They advertise your products without consuming much space yet displaying an efficient representation of information such as display new products, exclusive promotional offers, or simply about main categories. Sliders can thus contribute to your marketing efforts with a distinct, customized approach. Do check out the video to learn how.
Smart Banners: A smart banner is a unique and efficient promotion strategy for marketing your eCommerce apps. It pops up at the top of the mobile screen when a customer opens the app or views the store in mobile view. With the Appmaker dashboard, you can create a smart banner to increase app downloads in just a few clicks.
Email Footer: Here’s another way to promote your app. An email with a few links to your app can do the trick. Usually, they are email confirmations for the orders with the links to your apps as an email footer. These are great ways to ensure that your customers come back to you and get to know about the latest offers through their app.
Here’s a Slideshare of the entire process of building a mobile app.
Frequently Asked Questions
1. How do I start making an app from scratch?
Creating an app from scratch starts with building a web store. Simply create a WordPress website in no time and convert your website into mobile in just a few clicks.
2. I don’t have coding skills, can I still create an app for my website?
Appmaker’s simple mobile app building platform will help you build, customize and publish your app with zero coding skills.
3. How much does it cost to build an app with you?
Appmaker has the right plan that fits the needs of your business. We offer 3 pricing plans namely Starter, Growth, and Scale. We also provide enterprise pricing for large businesses with custom feature support.
4. How long does it take to publish an app?
After the submission, a wait time of 5-7 days is taken for an app to be reviewed and approved by Google. For an iOS app, the wait time is 3-5 days after submission.
5. Do I have to make changes to my mobile app every time I make changes in the website?
No. Appmaker’s WooCommerce mobile app offers real-time synchronization. This means, whatever changes you make in the website will reflect on the mobile app within no time.
6. Will the app support my WooCommerce plugins?
Our WooCommerce app maker supports most of the apps available. Additionally, our team will add support for the plugins you require.


No Comments
Leave a comment Cancel