Do you want to start an eCommerce business using WooCommerce? We have what you exactly need – A WooCommerce tutorial for beginners that gives you step-by-step instructions on how to install, configure and customize your WooCommerce store.
What to expect from this WooCommerce Store Setup Tutorial
This all-comprehensive WooCommerce beginners guide helps you find the answers to the following questions:
- How to configure WooCommerce’s basic settings with its install wizard
- How to create your very first a WooCommerce product
- How to set up a WooCommerce store
- How to set up some WooCommerce payment gateways
- How to configure other WooCommerce settings
- How to manage orders, coupons, and reports
What is WooCommerce?
WooCommerce is an extension of WordPress, the most popular website builder on the market. This allows users to build an eCommerce website from scratch or add shopping cart functionality to an existing website. It integrates content with eCommerce for your store online. It is WooCommerce is the most popular eCommerce platform which lets you have flexibility and control when it comes to site maintenance.
WooCommerce has 4 million active installs and a 4.6 user rating on WordPress.org. It offers a variety of tools such as shipping and payment methods, and variable products.
What do you need to make a WooCommerce store?
Before setting up a WooCommerce store from scratch, make sure you have these prerequisites for any eCommerce store:
A WordPress hosting account where all your website files are stored: Hosting is an important consideration as it affects the page load times. Since WooCommerce is resource-intensive as compared to normal websites, choose to host diligently.
Below are the hosting partners:
Single sites: Bluehost, SiteGround, and WordPress.com
Multiple sites (5-site deal): Pressable
A domain name that serves as your website’s address on the internet: According to WordPress.org, a domain name is ‘A domain name is a custom address for your website or blog hosted with WordPress.com. You can register, map, or transfer a custom domain name to your WordPress.com site so that people have a memorable and unique address they can visit.”
An SSL Certificate to ensure security for your online payments: SSL is a security feature that enables the communication between a website server and an internet browser so that the data exchanged between the two remains hidden from third parties.
Now let’s get started with our WordPress WooCommerce development tutorial:
Step 1. Getting started with WooCommerce
The creation of a new WooCommerce store starts with the following steps:
- Installing WordPress
Next, install WordPress. Most of the time, your host will have a shortcut in place to log in to WordPress.

- Setting up WordPress
After logging in, set up the basic WordPress settings from your dashboard.
Next, add your website’s title and provide a tagline or description (optional). The SSL certificate for your domain name will be automatically installed. Make sure that the website URL is showing HTTPS.
Subsequently, review the admin email address in which you would like to receive WooCommerce notifications and password reset requests. Set the time zone settings and save the changes.
Installation of WordPress is complete and now you are ready to install WooCommerce.
Step 2. Installing and Setting up woocommerce
Let’s start with how to install and set up woocommerce:
- Install the Plugin
Search for WooCommerce at the WordPress.org plugin directory and select the plugin as given below. Click Activate

- Access the Setup Wizard
WooCommerce activation immediately launches the WooCommerce setup wizard.

- Store Setup
First, you will need to select your store location, currency, and what type of products you want to sell.

Click on the Let’s go button to continue.
- Select your payment gateway
In the next step, you can select which payment processor you want your store to use. WooCommerce supports Stripe, PayPal, and offline payments.

Click the toggle to enable these payment methods and provide your email address to set them up.
Alternately, you can turn them both off and set them later by visiting the WooCommerce » Settings page and switching to the Payments tab.
When you’re done, click Continue.
- Set up your shipping zones
After payment processing, configure your store’s shipping settings. You can select free shipping or add flat shipping costs for different zones. A shipping zone is just a geographic location you want to apply a particular delivery rate to.

5. Add recommended extensions (Extras)
WooCommerce recommends a few options that can be useful for a broad range of online stores. You may uncheck all of them and install them later when you need them.

Next, you will be asked to install the JetPack plugin. You can simply scroll down to the bottom and select Skip this step.

- Complete the Setup Process
After setting up everything, check that everything is configured correctly.

WooCommerce automatically generates a set of default pages that are required for all the eCommerce stores. To check them out, visit your website and look for your Shop, Shopping Cart, and Checkout pages.

If you want to make further changes to your WooCommerce settings, you can do so from the WooCommerce > Settings screen.
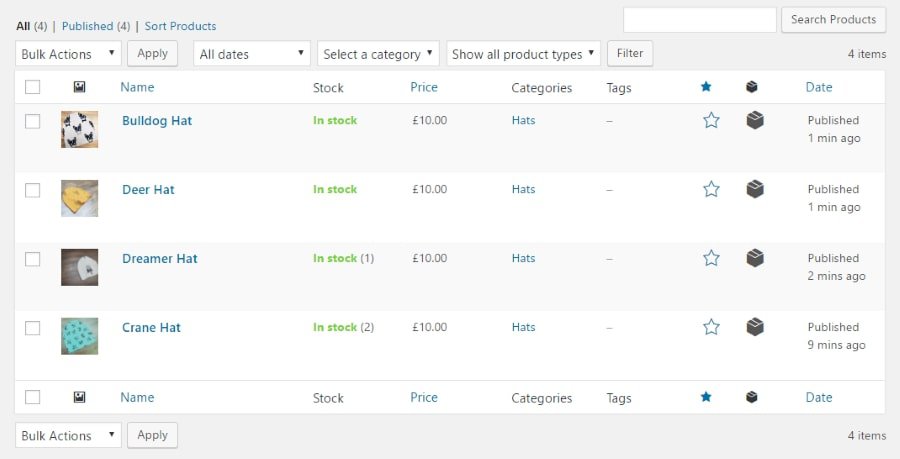
Step 3. Adding and Managing products in WooCommerce
Adding products in WooCommerce basically happens through the classic WordPress editor plus some additional options. The process is similar to creating a post or page, including that you can use the formatting options and add images and other media. All of this will appear on the main product page.

- Product Categories: Gives you the option to divide your products into categories and subcategories and aides customers to find what they are looking for.

After that, you need to scroll down a little to the ‘Product Data’ box.
- Product Data: In addition to categories, you are able to create tags customers can use to find products.

- Product Short Description: This description will be used on different product pages on your website. You need to add a catchy and informative short description.

- Main Product Image and Product Gallery: This works the same as a featured image and will appear both at the top of the product page and in the shop. In addition to that, you can also add an image gallery. This might be to show different product variations, images from other angles, and more.
Click on the Publish button at the top right box on the screen to publish your product.

You can now repeat the process to add more products to your website.
Source: websitesetup.org
Step 4. Choosing a WooCommerce template & theme
What does a theme do?
A theme changes the design of your website, often including its layout. Changing your theme changes how your site looks on the front-end, i.e., what a visitor sees when they browse to your site on the web.
Free & premium
There are thousands of free WordPress themes in the WordPress.org Theme Directory. You can also use custom themes.
You can install a free WordPress theme from the WordPress.org themes directory. For installing a theme you need to log in to your WordPress admin area and then go to the Appearance » Themes page and click on the Add New button.

You can select from: Featured WordPress themes, Popular WordPress themes, Latest WordPress themes, search for a specific theme or search for themes with specific features.

Once you select a theme of your choice, WordPress lets you install your theme and show you a success message along with the ‘Activate’ or ‘Live preview’ buttons.
Some themes may require you to add additional settings options. You can follow the on-screen instructions.
Step 5. Customizing Your WooCommerce Store
WooCommerce is so popular because it’s so easy to extend and customize with plugins. Installing WooCommerce plugins and extensions helps you customize your WooCommerce Store. You can use them to create contact forms, make landing pages, add pricing tables, gift cards, and more.
Frequently Asked Questions
- What Kind of Products I can sell with WooCommerce?
You can sell any kind of product with WooCommerce. Whether they are physical goods (products that require shipping), digital downloads (ebooks, software, digital art), or even subscriptions.
- How do I change my WooCommerce store name?
You can change your store name by visiting Settings » General page in the WordPress admin area. Simply change the title to whatever you want to call your store.
- Can I create an app for my WooCommerce store?
Appmaker, the simple mobile app builder for woocommerce, will help you easily convert WoocCommerce to mobile app by setting up your Android and iOS app. Installation and configuration of the WooCommerce Appmaker plugin are the initial steps for creating your app.
- How can I get WooCommerce support?
Since WooCommerce is free software, there is limited WooCommerce support available through WordPress community forums as well as the official WooCommerce website.
Sources: wpbeginner, websitesetup.org
Already a WooCommerce store owner? Build a Mobile App to Win More Customers
Appmaker specialises in Quality and Performance guaranteed, E-Commerce Android/iOS Apps for E-Commerce Businesses. Get in touch


No Comments
Leave a comment Cancel