It is no secret that creating an in-app product page that is well-optimized on your eCommerce mobile application can boost your reach and income exponentially. The way you structure your product pages can make or break the success of your WooCommerce mobile application business.
As a business owner, your primary aim was to convert your website into a fully functional app. Now it’s time to optimize your app by creating mobile pages and getting the attention of your customers.
This WooCommerce app page tutorial intends to take you through the steps by steps process of creating in-app product pages using Appmaker.
Mobile Landing pages
Creating an app landing page is so important that you can even plan one right before developing the app code. The relevance of the app landing page unfolds in itself from the concept of post-launch. It is very influential even before the product is introduced in the market. An in-app product page is one of the best ways to gear up your app for success.
Tips to help you build better in-app product page
Place the logo and name of the app clearly with perfect color metrics. The visitor should know who you are, in the first very visit.
Keep the title short enough to narrate the app. You can use your creative skills to the best of the standard to attract readers.
Use clear call-to-actions that are easily accessible. If you have already launched the app, give your visitors a chance to download it. If you fail to make the CTA better, there is no use in creating a good app landing page.
Adding video to the in-app landing page can be of great help. You can give users a better tour of the app, benefits, features, etc.
Share the details briefly on the in-app landing page, rather than showing your writing skills. Users may not have enough time and patience to learn the entire process. Keep the features and other details to the point.
App product pages
Appmaker In-App Product Pages helps to create native pages in your app without writing a single line of code. You can make use of the drag and drop interface to design pages by adding images, texts, products, etc.

A web page has a lot of possibilities compared to an In-App page while we talk about designing. The limited screen size of apps adversely affects the design of the In-App product page.
Appmaker has considered all the possibilities that are required to enhance your WooCommerce app and the best designing tools are provided which requires no technical skills.
The page followed by the splash screen in your app is an In-App page. You could create, delete and manage your In-App pages according to your needs.
Consider you are creating an app for your eCommerce store, you either want to:
- Display all your products in a single In-App page, or
- You would like to categorize your products. This is done by clicking a category to take your customers to another In-App page of that category.
How to create an In-App page in your eCommerce App?
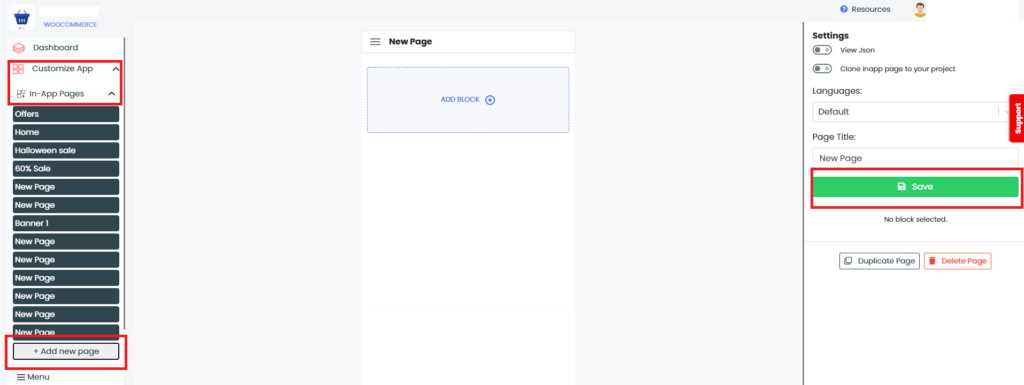
Step 1: Click In-App Pages under Customize App to design the home page for your app and click Add New Page. You can give a name to Your page under the field Page Title.
Step 2: On the new page, click on Add Block. All the available blocks will appear in the drop-down list.
Step 3: Select the block of your choice from the list. Here, we are selecting the Banner block
Step 4: Click on Media Library or Insert from URL buttons for adding the banner image
Step 5: Next, click on Choose an action and Choose Category from the Settings section on the right side of the page. Let’s choose Open Product.
Step 6: From the list, click the category that best suits your product/service
Step 7: Click the Save button to save the changes made

To open an In-app Product page
Step 1: Click In-App Pages under the Customize App. A list of pages appears
Step 2: Click on the name of the In-app page that you want to open. And your page appears!
Your In-App page is created, and now you have to add new content to your In-App page. For this Appmaker provides a set of blocks to choose from according to your needs. Go back to step 2 of the previous process to add blocks.


No Comments
Leave a comment Cancel